18 November, 2017

Where you can find me: Holiday 2017 Events

2017-11-18T07:56:56-06:00Everything Else, Out & About|Comments Off on Where you can find me: Holiday 2017 Events

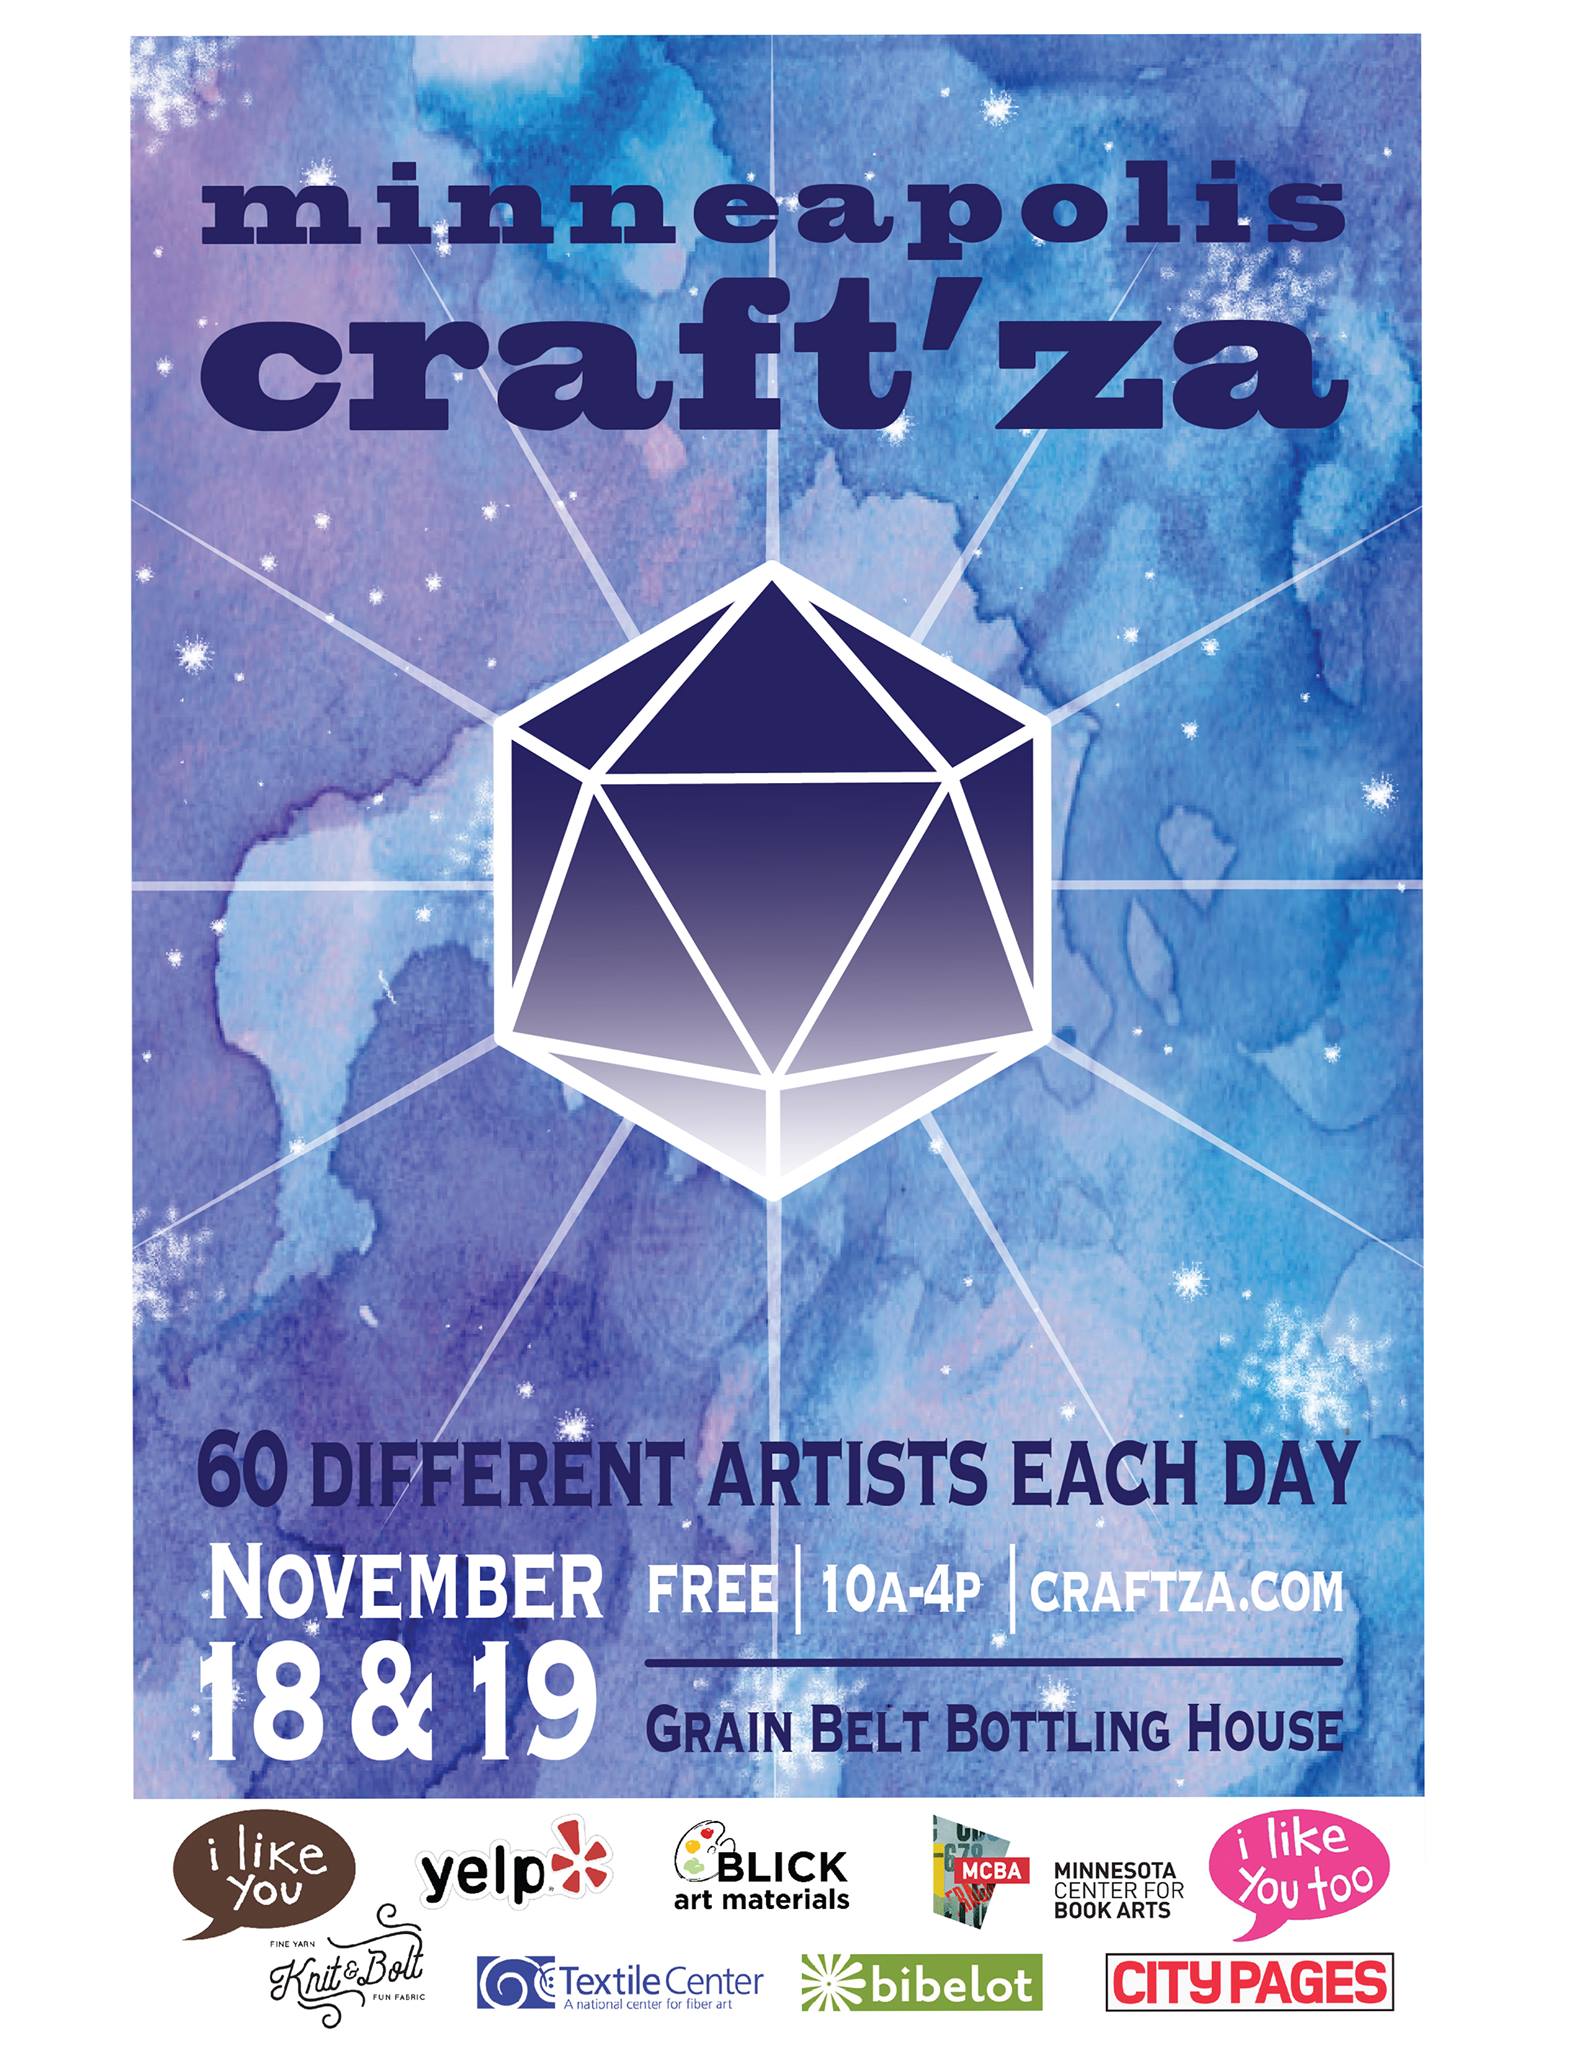
Minneapolis Craft’za

Sunday November 19 I will be at the 5th Annual Craft’za show at the Grainbelt Building in NE Minneapolis. This is my second time there, although I have done the sister show Craftstravaganza for a number of years. This year is the first time it will be 2 days and I will be there on SUNDAY. You can see a little sneak peek of my work on the local Fox9 station on Sunday morning. Four artists did a little demo & interview which will be airing on Sunday morning. (If you have found me here from Fox9, hello!) Find me at booth #58. November 19 • 10 – 4

Bakken Winter Market

On November 25 & 26, I will be at the Bakken Museum for their Winter Market. I have made some special Bakken inspired pieces from art I made with them back when they were a partner on my State Arts Board grant. Have Thanksgiving visitors? Come visit the museum and shop with local artists. Fun! November 25 & 26 • 10 – 3:30

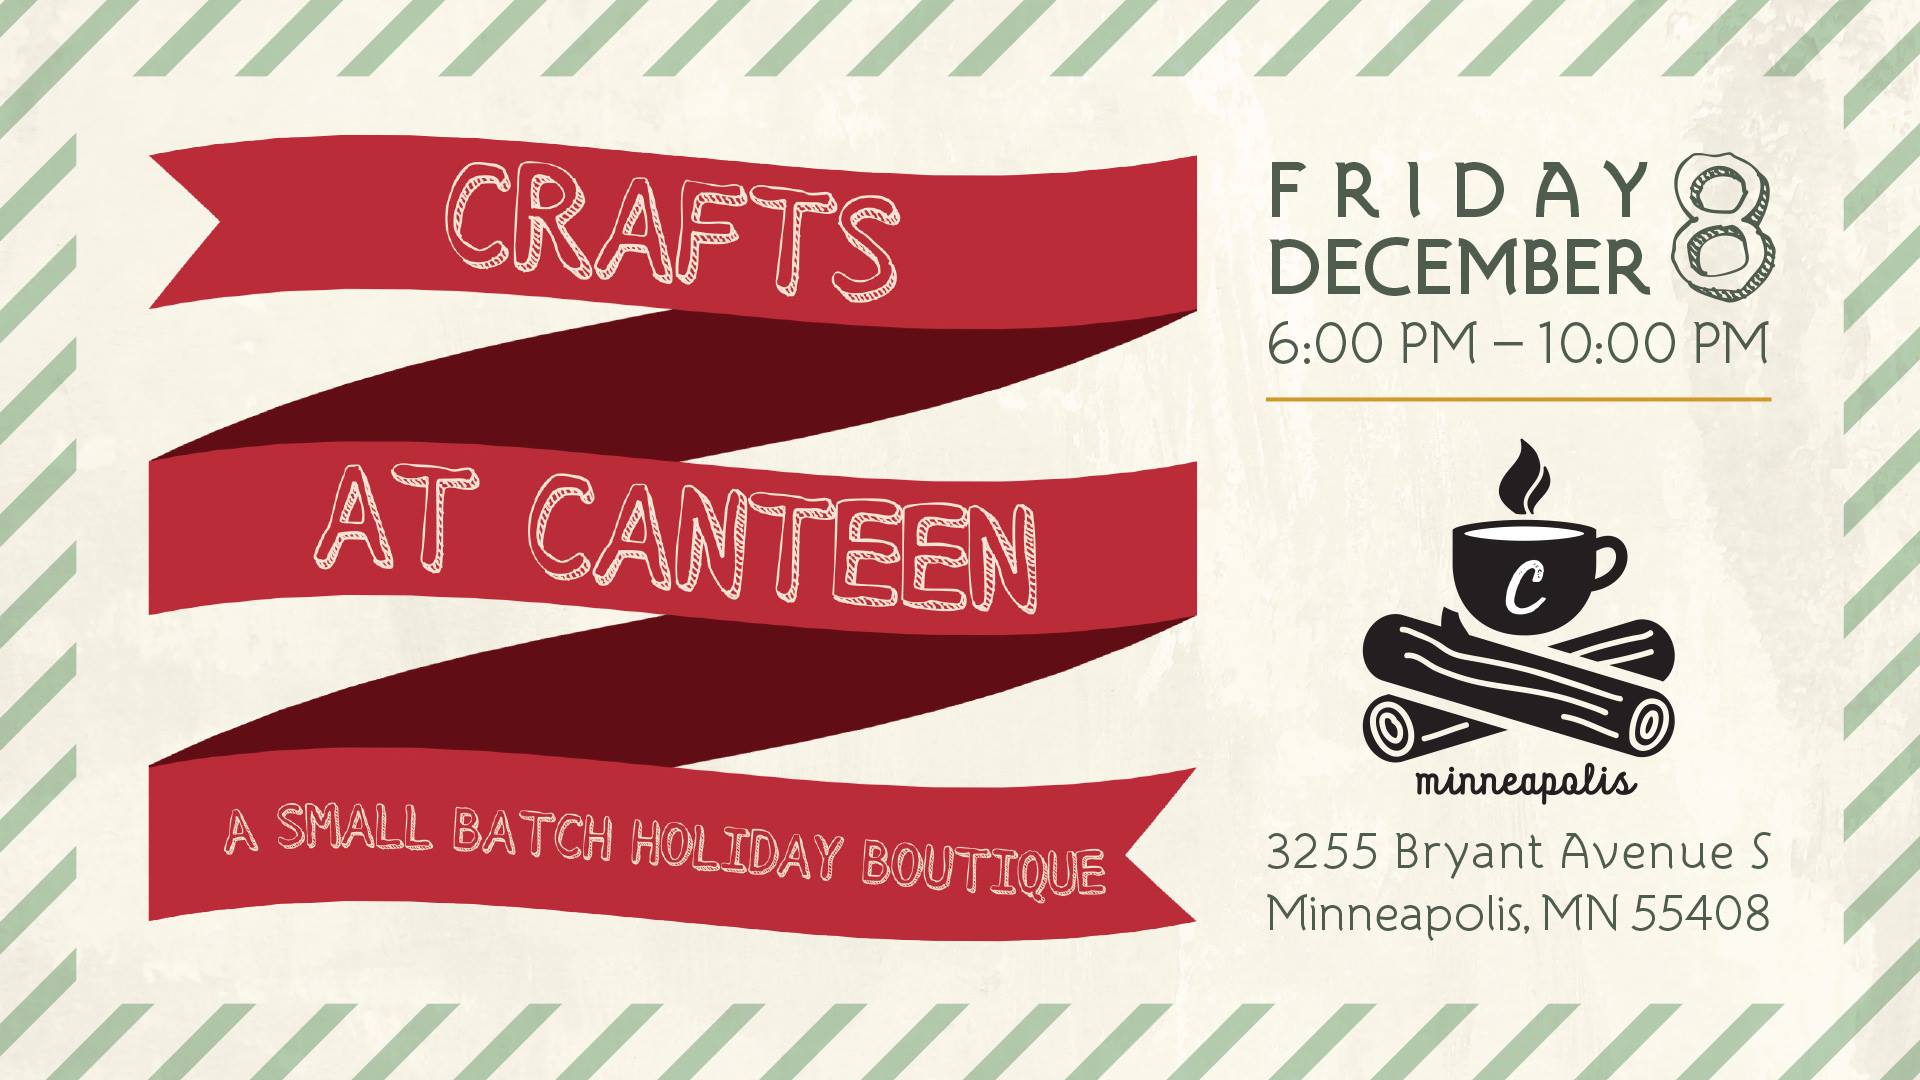
Crafts at Canteen

A tiny little show with 10 awesome artists hosted in a coffee shop that specializes in toast. This quirky show is new for me and should be lots of fun. Just one evening. December 8 • 6 – 10 pm

2 November, 2017

Giving doesn’t always = $.

2017-11-02T16:41:04-05:00An Artist's Life, Everything Else|1 Comment

I originally posted this in June 2013 and then again in 2015 and then I thought of it again today after a frustrating week of too many fundraising discussions and I thought it was a great time to revisit it. I have worked basically my entire life for non-profit orgs. My very first job was at a summer theater funded entirely by donations and I made a donation pitch in the form of a stupid song and dance routine at three shows a day.

It is fundraising season (I just got my first fundraising email on Halloween day.) and that means that you will definitely be asked to donate to more organizations than you can afford to. And that’s totally ok. Me too. Here are some ideas.


I have worked for and volunteered for and advocated for a number of non-profits throughout my entire life and all of them have been pretty amazing creatures that do pretty amazing things.  So, I have had a couple of conversations lately with a number of different people about “I love this organization, but I can’t afford to donate anything and I feel bad about that and so I don’t know what else I can do.” and I wanted to say that there are TONS of things that you can do that don’t cost you anything, but can be enormously valuable to a non-profit.  So here’s my list of 8 simple things you can do that will cost you very little and can add up to a lot.

Participate.

A lot of grants that non-profits write to help support their free concerts, exhibitions, and make-and-take programs are all about the number of people served.  There are whole sections of grant applications that require the organization to talk very specifically about the audience and who will be participating.  So, everybody who shows up gets counted and the more people that attend a concert or sign their name in the guest book, the bigger the impact the organization can show.  So just by showing up and seeing the art in the gallery and then signing your name in the guestbook, you are saying to that funder or sponsor “I think this is valuable” and that makes a big impact.  Opening the email, clicking the link, or showing up at the event are all ways for you to be counted. And do you know what makes it even better? Make it a date and bring a friend with you.

Comment.

Good or bad, take the time to write a comment or complete an evaluation:  “I really loved seeing this work in person because it was so amazing to be able to see the detail up close.  I will come back again for your next exhibition.” or “My kids and I attended the concert in the park and they spent the rest of the afternoon pretending to play violins and conducting their own imaginary orchestra.  What a great afternoon!”  One of my very favorite REAL quotes from a teacher that brought a field trip to my art center:  “The second grade says weaving is better than recess!”  (We named our annual youth programs exhibit after this quote.)  Quotes are also a valuable way for non-profits to communicate with sponsors and funders as a way to say “We know this project is successful because we have this feedback from people who participated.”  Evaluations are required by many program funders and feedback good (or not so good) is all really important.

Like it or tweet it.  

Every non-profit would like to reach more people.  If you see something on your favorite organization’s website and you hit the “like” button, you become part of the magic algorithm that networks like Google and Facebook use to rank search results.  Very simply put, the more people “like” something, the more the search engine thinks that it must be “important” or “relevant” to whatever it is looking for.  So something as simple as clicking “Like” on a post about an upcoming class about shibori silk scarves can mean that more people will discover that art center you think is really cool when they are searching around on Google. Even better is to share it and hashtag it. That means it is even easier for the organization to track how the word is spreading.

Link it.

Have a Facebook page or a website or a blog?  Post a link to your favorite non-profit’s website.  Links to organizations work the same way as likes and tweets.  The more connections to the site, the more important the search engines think it is and the bigger the potential reach for your favorite organization.

Spread the word.

The next time you are at your art center or a concert in the park, take an extra postcard or flyer about an upcoming event and stick it up on the bulletin board at work.  Or at your favorite coffee shop.  Or at your church.  Let me tell you from experience that getting those beautiful postcards out into the world is one of the hardest jobs ever.  There is just never enough time in the day (or postage money in the budget) to get everywhere you would like to get them.  If you get an email about an event, pass it on to a friend or post it on your Facebook page.  (Or print it out and put it on the bulletin board).  Even just talking about it is great!  Word of mouth is a really powerful tool, especially if you tell your story and why you think that organization or event is cool.

Donate stuff, but ask first.  

Speaking for my several non-profits I have worked for in the past, they were delighted to get donations of stuff, but have about zero square feet of storage space to put it in.  So although I would LOVE to have your yarn, I might have to store it on my desk until I can make room to put it. Which isn’t really ideal.  But there are really goofy things that I need (that you might not even think of) that I could put to good use right now.  Like a gallon or two of vinegar or a salad spinner or ziploc bags. Many organizations have a “wish list” that might contain something you have collecting dust at your house. I just found a new home for a microphone sound system that someone gave me years ago. If in doubt, send an email and ask. Because I know we arts people are connected. If I can’t use your thing, I bet I know someone who can.

Give time.

Do you have an hour?  Would you be willing to hand out programs at a concert?  Or stuff envelopes for a mailing?  Or weed the garden around our building? Or help clean up after an event?  Volunteering seems like an obvious one, but sometimes the hardest jobs to fill are the ones that sound boring.  Everyone wants to attend the XYZ Event for free in exchange for some volunteer hours, but maybe you would be just as content to listen to the radio in your car and deliver these concert flyers to all the public library branches in Minneapolis.  Or maybe you would be happy to look up the address and contact info for all of the afterschool programs in the metro area and address some envelopes for me so I could send out some field trip applications?  Also if you have special skills, tell someone.  Are you a master gardener and want to help put our gardens to bed for the winter? Do you have beautiful handwriting and want to write some thank you notes? Let us know what you are good at.

Take photos.

Do you love to take photos? As staff at an event, I am lucky to have a minute to snap a few pictures because I am busy making the event happen and although I would love to hire a photographer for every event, that is just not in the budget.  But I would LOVE to have your photos if you are willing to share them.  Photos are another great tool for spreading the word and showing the impact of a program or event.  They are a handy way for us to document who was there and what happened so we can refer to it next year when we start to plan the next one. They don’t have to be fancy or professional photos, just ones that you give permission for us to use.


I hope this inspires you and maybe gives you a few ideas as this “annual fund” season rolls around.

This week I participated in a focus group, reviewed grant applications for the regional arts council, rounded up some resources for board of directors discussion, handed out some postcards for a friend’s gallery exhibition, and liked some things on Facebook. Last month, I bet I did everything on this list.

Donating dollars is hugely important to these organizations too, but I hope these are ways you can maybe make the $ you are able to donate add up to a whole lot more.

26 October, 2017

“Wait. How do you make your art?”

2017-10-26T14:50:33-05:00An Artist's Life, Everything Else, Spoonflower & Fabric Design|2 Comments

I have pieces up at two exhibitions right now and I was at two openings last week, talking with dozens people about what I do. I love that part. But I realized that nearly everyone would stop me at some point with a puzzled look and say “Wait. How did you do that?” And I thought to myself, I should make a video that shows how it all works. So I did. Here is my very latest fabric design from blank page to finished jacket.

18 September, 2017

“I ain’t no size 2.”

2017-09-18T12:19:02-05:00An Artist's Life, Everything Else|6 Comments

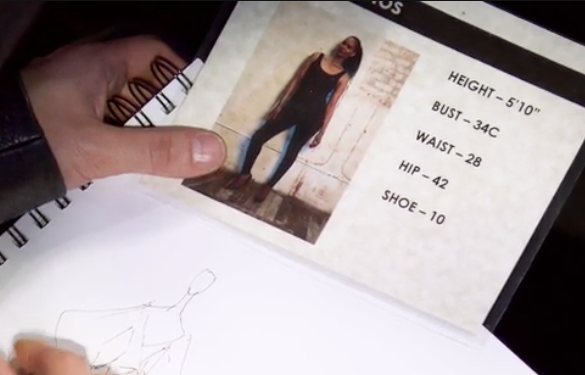
We’ve been watching the most recent season of Project Runway. I love the show and I think Tim Gunn is completely brilliant. One of the new things this season is that the designers have to work with “real” sized models. Not just size 0, but ladies with some curves, which is awesome. I usually yell at the screen when I see the designers doing things with dye while not wearing gloves (a huge pet peeve), but this season I find myself yelling at the screen because they are complaining about having to design for “large” or “curvy” or “plus sized” girls. Or when they say that they have never designed for bigger than a size 0.

Because you know what? They showed a couple of those cards with the models’ measurements and I grabbed a screen shot. One of those “bigger” girls that the designers were having a fit about: her measurements are basically the same as mine. (Except for the height. I am only 5’4″.) I sew clothing and I sew clothing a lot for myself, so I know my measurements and when I saw this card and heard them calling her a “big girl” I was a little bit… annoyed? disgusted? angry? offended? I am not sure. Either it’s “Woohoo, I am built like a model!” or “When did I suddenly become plus sized?” I am a short curvy size 6.

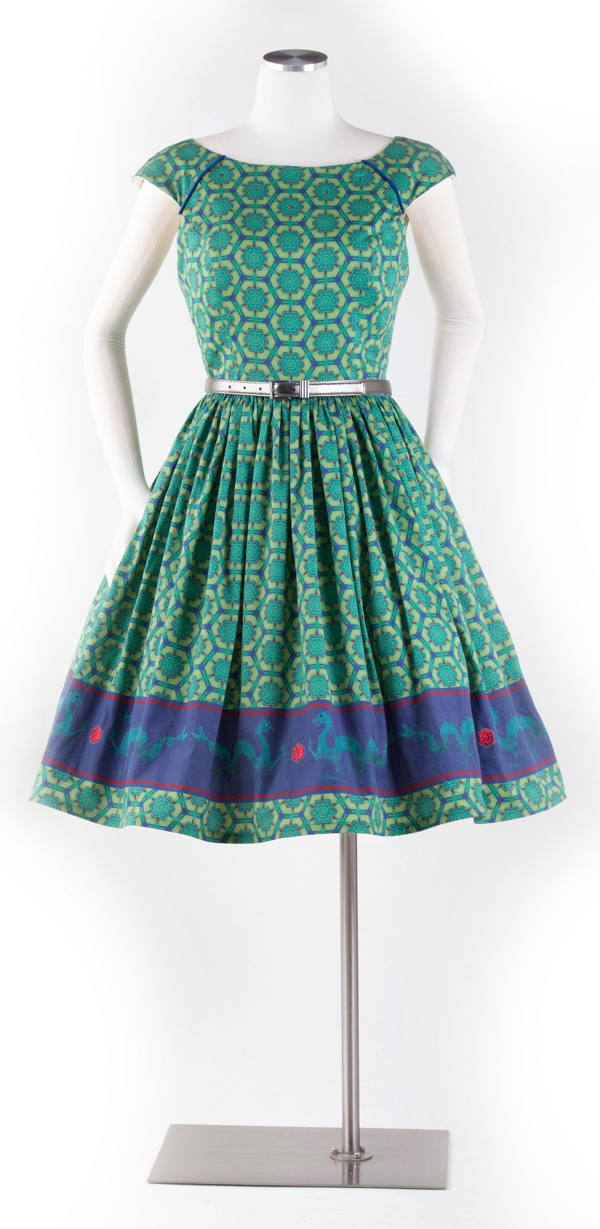
I spent the weekend doing a photoshoot of a bunch of my work. I have some exhibitions I want to enter and some work that I hadn’t had a chance to photograph yet and so I set up the dress forms and started shooting. That is my super glam set up in the basement. I do a lot of photos on dress forms because I like how they give the garment shape but basically the form melts into the background. They let the garments be the star of the shot and that’s really important to me. I rarely shoot on people because I think it’s distracting. Your brain is hardwired to look at faces and so that’s the first thing you look at, not my art.

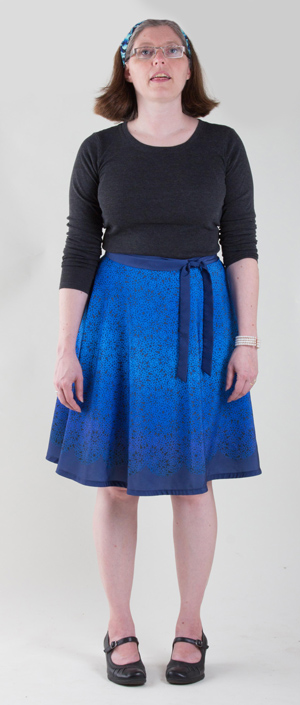
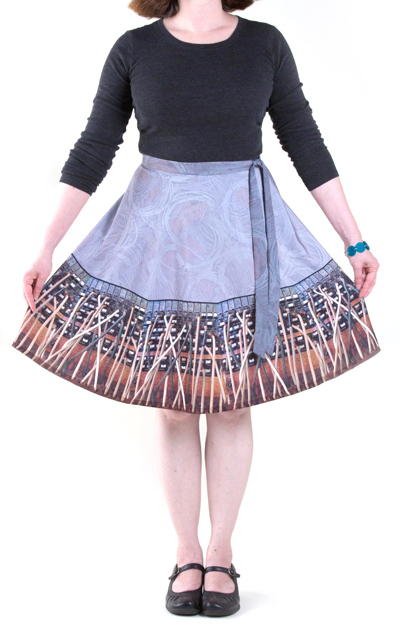
But I had some more pieces, these wrap skirts specifically, that needed to be on a person. So that’s me getting to be the model. My husband shoots the photos when I am modeling. He’s a good guy. It’s exhausting (as you can see from our last dorky shot of the day), but I have several reasons that I didn’t want to hire a model to do it for me. There is the financial reality that if I hired a model, I would have to add significantly to the costs of these garments in order to cover that cost of finding, scheduling, and shooting with someone else. And I am not implying that my time is free, just that I can add those hours into the rest of the time I am paying myself for making/designing these and that makes a lot more sense.

So I have now spent several hours editing these photos to get them ready for various things. Adjusting the light, erasing the shoe scuffs on the paper, cropping, straightening  and so on. And scrutinizing my body. (Do I have any volunteers who want to do that for a couple of hours? I didn’t think so.)

These wrap skirts are headed to my Etsy shop. I made a whole line of them (and some dresses which I haven’t photographed yet) for a couple of shows last year and I am finally getting an online shop put together that is all of my clothing and accessory pieces. I love these skirts. I love to wear them, I love how they move, I love how the fit is flexible so that you can make it fit whatever size you are today and be comfortable. I wear mine all the time and they fit my style. The rest of the pieces (mostly scarves) I have in the Etsy shop are on dress forms and they aren’t getting a lot of attention, so I thought maybe I needed the skirts to be on a person instead, to show the way they fit on someone with curves and bumps and a real figure. Because my dress forms are anything but real.

This is supposedly a size 4 dress form, but she is wearing a padded bra, two layers of bubble wrap around the waist, two petticoats and I still have a pleat pinned in the back to make this dress (which fits me) look like it fits on this dress form. For the last exhibition I did, I brought a whole roll of quilt batting to pad out my dress forms for more realistic figures because I don’t sew “sample” size garments. I make things that fit me. These dress forms with the arms only come in a nominal size 4. Coats and other things with sleeves look so much better on something with arms, so padding it out is the compromise for me.

There’s all kinds of marketing wisdom that says that your clothing has to be on a person to sell it online. It’s about selling the lifestyle as much or more than the item. People want to visualize themselves and they need that visual clue to make that happen. So I wanted to photograph those skirts on a person and see if that makes a difference to the reaction and attention that these get online in my Etsy shop. And I thought it was important that it was a real person and not a “model” figure.

Because despite the fact that I LOVE these skirts, I am really on the fence about whether I am going to continue making these at all. In person, they draw people in. I design very rich, complex surface patterns and these fabrics beg you to touch them and look at them up close. You can hold them up to you and that visualizing-yourself-wearing-it step is so much easier. Even if you aren’t a skirt-wearing kind of person. But what I have learned is that when I sell them in person, I spend the entire day having the same conversation.

That conversation is about personal body image issues.

I love this so much, but I can’t wear skirts because they make me look thick.

This is so great, but it hits the fat part of my calves and so I never wear skirts.

I wish I could wear this but I have no waist and so it would just make me look cut in half.

At the end of the day, I have heard about the insecurity, the perceived flaw, the thing that everyone feels that is wrong with themselves from all of these lovely women that I am meeting for the very first time at this art show. I might not even know their names, but I know that they think they have fat calves. Because they want to say something nice and tell me why they love this piece of fabric they have in their hands, but they don’t want to buy it. So they blame that on the easiest thing to blame. Themselves.

And it’s kind of heartbreaking. I don’t want to know what makes you feel insecure or unattractive.

The thing is, I know that only a small number of people that walk through my display are even going to be interested in buying something from me. Every artist knows this. Style is very personal; you have colors and patterns that you are drawn to and that make you feel good. I totally get that. I can’t wear red or animal prints. They bother me. I love to wear skirts because I think they are comfortable. But that’s not true for everybody. I LOVE to talk about my work and how it’s made but I don’t take it personally if it’s not your thing, because that thing that “clicks” and makes it your style is something different for everyone. Clothing is even more personal because it is art that is displayed on your person, not just on your wall. I don’t think people are compelled to explain to a photographer or painter that “I love this painting so much, but I think it will make my couch look frumpy.” But I don’t know. (If you are a painter, please chime in, I am super curious.)

And I get it. I just spent a few hours zoomed in on these photos looking for lint and weird shadows and noticing the wrinkles at my waist and hearing that stupid inner critic voice say “that waistline isn’t as trim as it was when you were 20” and “that skirt would look more balanced if your torso wasn’t so short.” That inner critic voice is always there telling you to be more something or less something. I am pretty comfortable in my skin, but that doesn’t mean I’m not hearing it. All the time.

I am also limited by the materials a little with these skirts. This design is made from a single piece of fabric that is shaped like a large C. Based on the width of the fabric, I can only make these fit up to about a size 14 before the wrap is not wrapping enough to prevent you from showing off your knickers. So I am limited by the width of my materials and this design. And I could certainly print more fabric and piece it together to make it wider. But then there is a seam, which makes it hang and drape differently, and it takes longer to sew and I have to buy double the fabric. Which means that a size 14 has one cost and a size 16 is drastically more. Which is completely unfair. Ugh. (Or I raise the price so they are all the same and that makes them only affordable to people who have a lot more disposable income than I do. Also ugh.) Between explaining that I don’t have any larger sizes (which makes me sounds like a whiny Project Runway designer) and hearing about fat calves, it makes these a little less fun for me. And so they’ve been hanging in a closet, waiting for me to figure it out.

So the last thing I am doing with this post is fishing for someone to tell me that I am skinny and not plus sized. That’s not my point. I am writing this post because it is something that needs more thinking about.

How can I change the conversation? What can I do that encourages a more body positive conversation but that still lets me make wearable art and love doing it? Scarves are a practical solution. They don’t have a “fit”, they show off my patterns beautifully and lots of people love them. But lots of people make them too and everyone I know has a lot of scarves already.

I don’t know the answer, but I am very interested in the conversation. What do you think?

12 September, 2017

“What if nobody shows up?”

2017-09-11T17:31:16-05:00An Artist's Life, Classes & Teaching, Everything Else|12 Comments

Last year, I got a grant from the state arts board to make some new work. Part of the requirements of the grant was to have a part of the project that the public could participate in. This could be a performance to attend, art making, a video to watch. Something that they could interact with in some way.

I chose to do a series of mini-workshops where I showed participants how to do a tiny taste of my process making the art for the exhibition that was the culmination of the grant. The workshops were well attended and I had so much fun. A friend recently did a similar series of art making workshops for another grant. She posted about her nervousness and excitement about the events and one of the commenters on that post of hers really stood out for me. The comment was something like this:

“You are so brave. I could never do an event like that, I would be too scared that nobody would show up.”

I read that comment and I thought to myself, “Oh honey. Nobody always shows up. You can count on that.”

When I say “nobody” I don’t mean literally nobody. I mean that you never know exactly who is going to show up and it is never going to be who you think it is. I do a lot of art making events and residencies and pop-up kinds of things in many different venues because I love it, but the reality is that:

  • 80% of the time there are fewer people there than I would wish for
  • 5% of the time there are way more people than I am prepared for
  • 5% of the time there is just me and the crickets (or it’s cancelled altogether)
  • Which leaves about 10% of the time that the class is actually living up to what I pictured in my head

I often don’t know what category an event is going to fall into until I show up. About 25% of the classes I offered this year were cancelled due to low enrollment. At least one event that I had scheduled, the venue forgot I was even coming. I have had events this year that have sold out/filled up in just a few hours and ones that were teetering on the edge of being cancelled for weeks. Sometimes they snowball and a class gets cancelled on a weekend when I turned down other things, since I can’t be in two places at once. (And now I have no events instead of too many.)

The thing I had to learn is that the number of people that show up isn’t the most important part. Numbers don’t equal success. Numbers don’t equal value. Numbers don’t equal quality. And that’s hard to wrap your head around.

I worked at an art center for more than 11 years and I was in charge of scheduling classes and workshops and having to make the call when something would run or be cancelled. One of my “rules of thumb” was that pretty often, the first time you offered a new class it would not have enough students registered to be able to run but the second time it was offered, it would fill up. I can’t explain why with any certainty, but I have a feeling that it was some subtle psychology. There is a marketing theory, called the “Rule of Seven”, that says for an ad or message to be effective, you the consumer, have to see it 7 times before you will take action. I think that totally happened with these classes. By the time it was offered a second time, it seemed familiar and reminded that potential student that this was something that looked amazing the first time they read about it.

Think about it. The reasons for you to not do something (like sign up for a class) pretty much always outnumber the reasons to do it: you don’t have time right now, you shouldn’t spend the money right now, you don’t know the teacher and you aren’t sure you will like it, there’s so much else needing your attention….

And you know what? None of those reasons have anything to do with me, the artist who is offering this class or performance or art making event.

I did several art-making-in-the-gallery events when my exhibition was on display. I was there one afternoon for about 3 hours and I had four people show up for the activity. Four seems kind of depressing. But that group of four was delightful. We did the art project. No one was waiting, so we made another and everyone got to practice a second time. They took pictures, we posted to social media, we laughed and talked about all kinds of other creative ideas that they had while they were working. This was 6 months ago and I still think of that group and smile. There were several dozen other people who “said they were interested” in the event on Facebook or liked the post that I wrote about it. It went out in newsletters and postcards and word of mouth. Not everyone is going to be interested. Not everyone is even going to pay attention. But for those four people, the balance tipped the other way and the reasons to go do it outweighed the reasons not to and that, when you think about it, is something to celebrate.

When I say that 80% of the time there are fewer people there than I would wish for it’s not because the number is important by itself. It’s because I want to share that kind of experience with more people. That’s why I love teaching. It’s because there is something magic that happens when you have just the right size group to build some energy and spark conversation, where people feel like they can contribute without feeling self-conscious. A class of 3 people rarely hits that magic groove, but a class of 8 or 12 can be amazing. (A class of 50 rarely hits the magic groove either. It goes both ways.) Sometimes I wish for more students because the flat out financial logistics don’t work out if you don’t get enough. Then I am paying the venue more than I am making in order to use the space. That is difficult to sustain. Sometimes I wish for more because I want to build momentum. If more people took my beginning class, I would have the push and demand to develop the next more advanced one. And that’s fun for me and for my students too.

I feel like every day in my Facebook or Twitter feed there is a promo post from someone for how to grow your numbers. Number of followers or likes or shares or retweets. As if the number is going to magically make you successful and if you aren’t getting enough likes you are a failure. I think that blog commenter I mentioned at the beginning of this post had this same feeling: She couldn’t even do it, because if no one showed up then she would be a failure. I get it. If I looked at every cancelled class or low attendance as failure, I couldn’t do it either.

Instead, I try to think of it this way: Getting 100 “likes” is like getting a round of applause. It’s fun and very satisfying but it’s over in 23 seconds and everyone has moved on. But I would trade those 100 likes for another mini class with the four ladies from the gallery. Every time.

There’s a quote (with an original source which is highly debated) that says “It’s not the years in your life that matters; it’s the life in your years”. I am pretty sure that applies: It’s not the numbers in your class that matters, it’s the class with those students.

11 August, 2017

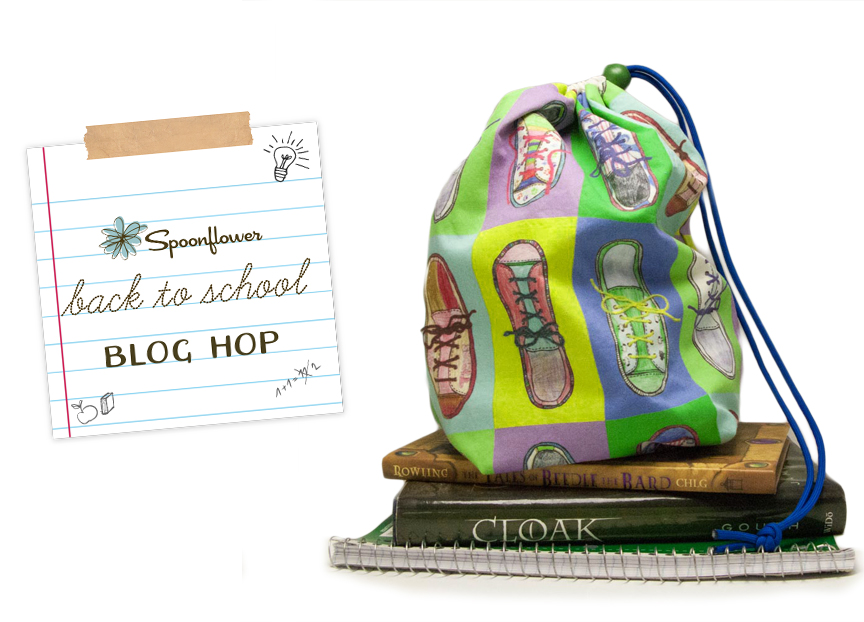
Fabric Design for Back to School: Pop Art Shoe Bag Tutorial

2017-08-11T08:17:10-05:00Everything Else, Freebies & Patterns, Spoonflower & Fabric Design, Tutorials|3 Comments

When you live in Minnesota, “Back-to-School Season” is quickly followed by “Snowboots Season”. When I asked my sister what she thought would be a great back-to-school project to share with the Spoonflower Back to School Blog Hop, she described a “stuff sack” type bag to put the kids’ shoes in their backpacks when they have to wear their snowboots to school. Something to keep the papers from getting dirty and books from getting crumpled by dirty sneakers. With each kid needing regular shoes, gym shoes and snowboots, there are a lot of shoes getting hauled back and forth on the bus every day.

Creating the fabric design.

Color & scan.

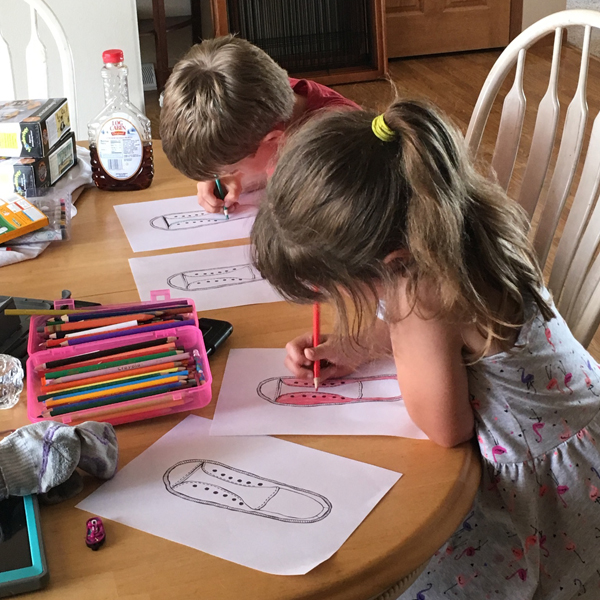
My niece and nephew are 7 & almost 9 years old and I thought the bags would be the most fun (and more likely to get used) if I could get the kids to help me with the fabric design. What better for a shoe bag than a fabric print with shoes?

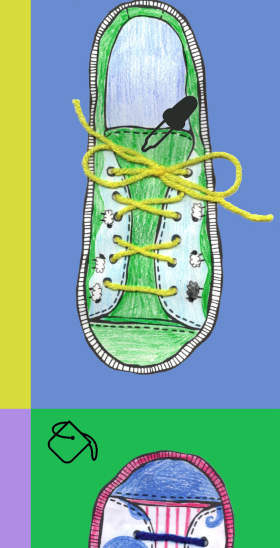
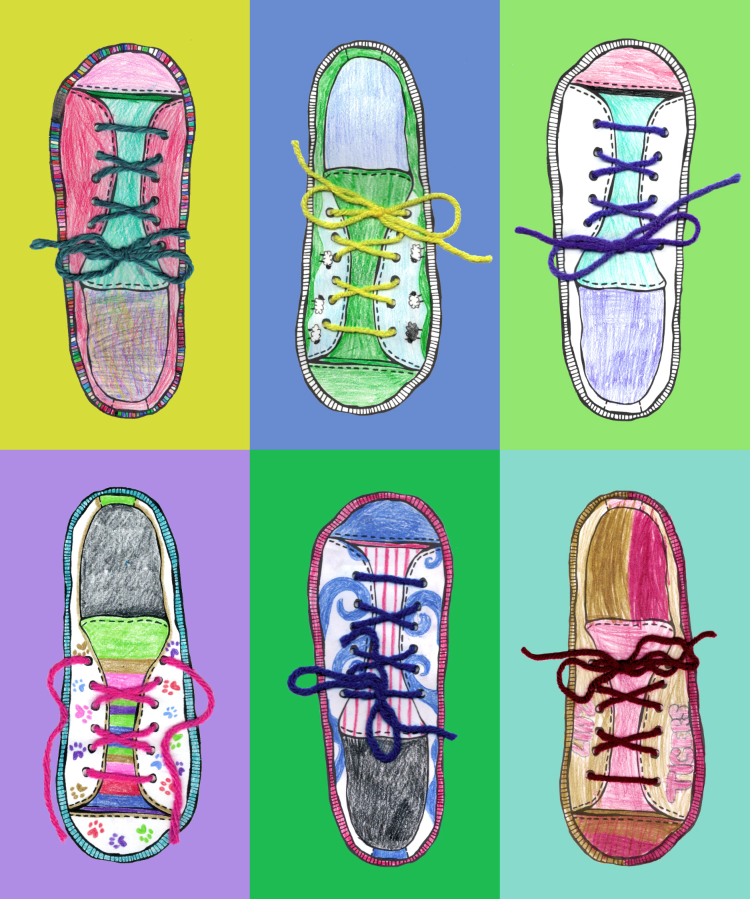
So I drew a coloring book page with a canvas sneaker. I drew it in fine tip sharpie, scanned it and emailed it to my sister. She printed copies and let the kids color the shoes any way they liked. They chose colored pencils for these, but this would also work with markers, crayons, or watercolor.

Download: If you want to make your own shoe print, you can download my shoe coloring book page here. It is yours to use any way you like.

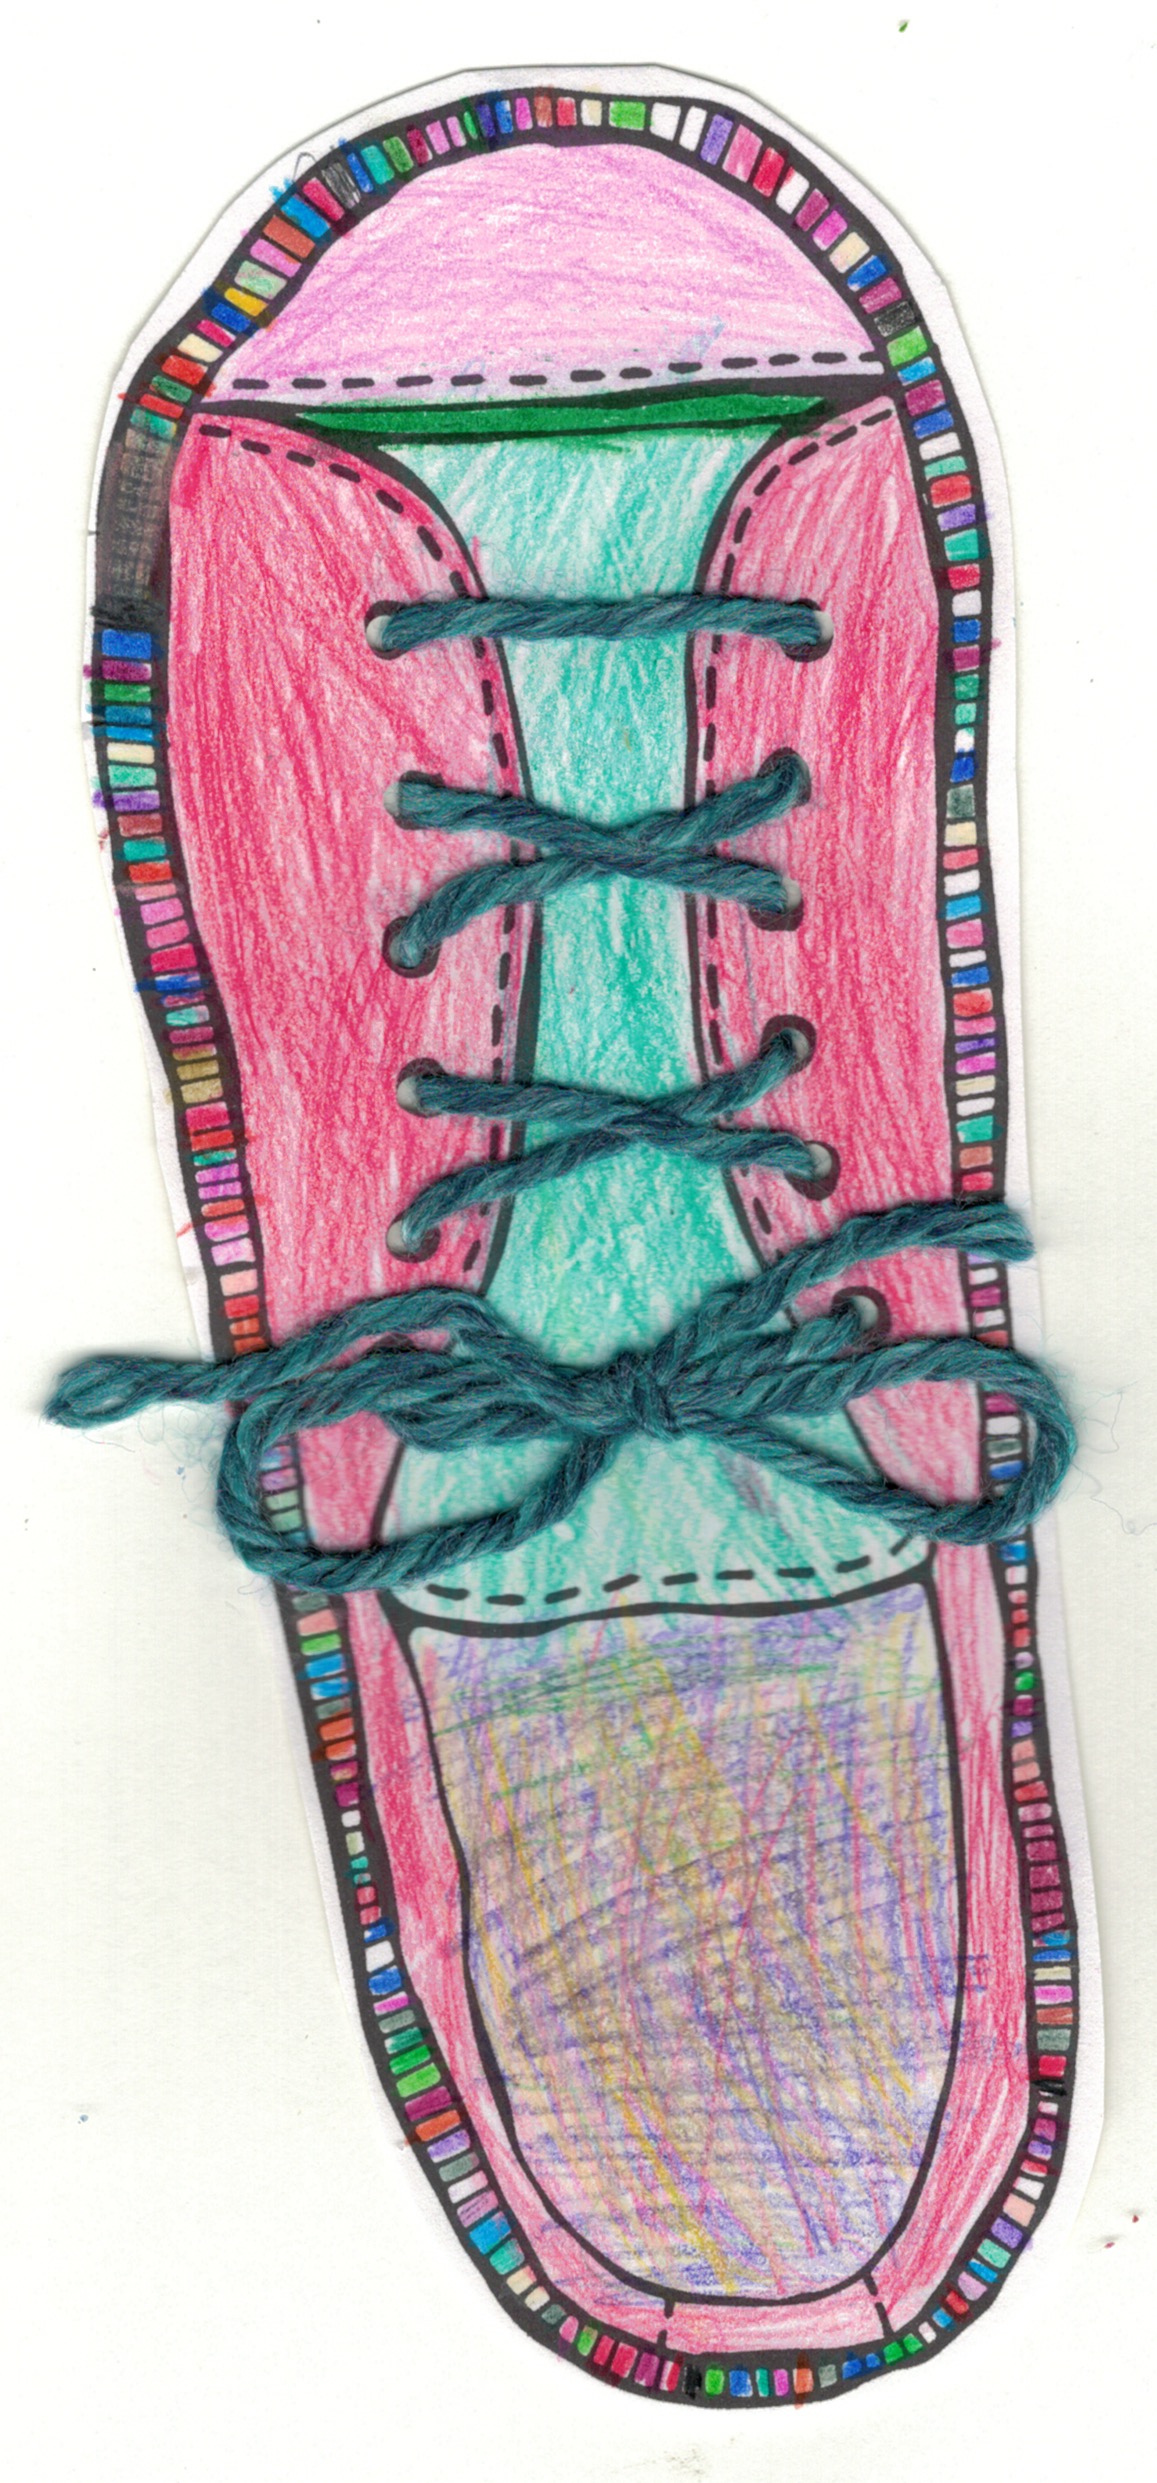
I love to add texture and dimension to my designs so when I got the colored shoes back from the kids, I used a 1/8 in paper punch to punch holes at the eyelets and I made shoelaces from colored yarn. I threaded it through like lacing the shoe and tied a bow. Then I scanned the completed shoes.

Make the background transparent.

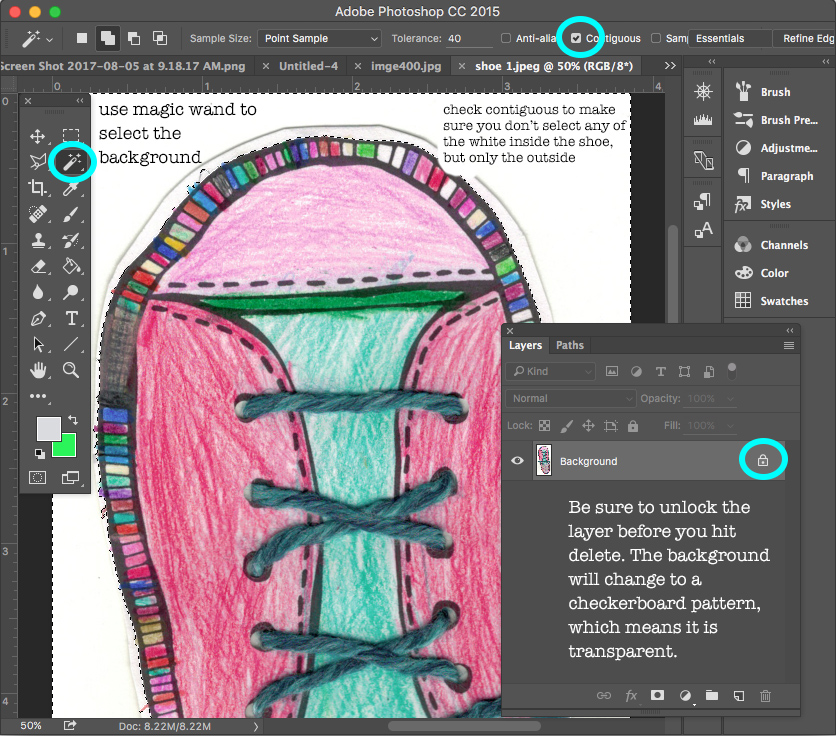
I opened each shoe in Photoshop so that I could cut out the shoe and make the background transparent. I used the Magic Wand tool to select the white background and then unlocked the layer so that I could delete that white edge and leave just the shoe.

  1. Choose the magic wand tool.
  2. Click the white area in the background of the shoe.
  3. Unlock the layer.
  4. Hit the delete key.
  5. The background should now be transparent (checkerboard).
  6. If your first click didn’t remove all of the white background, continue to select and delete the parts you don’t need.
  7. Here is a tutorial on how to adjust settings on the magic wand tool to fine tune and select more/less area.
  8. Save each shoe as a .psd file. (That’s a Photoshop file.)

Create the background canvas.

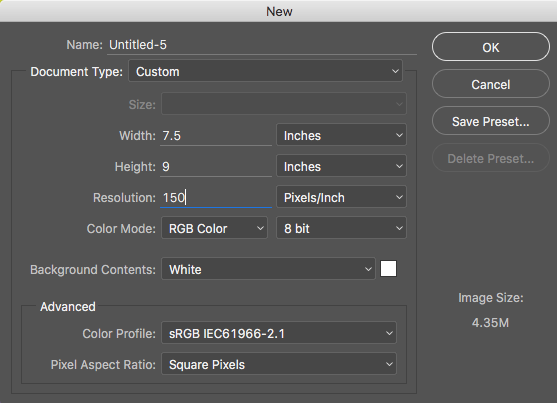
I wanted to do a repeating Warhol-inspired pop art design with the shoes by putting them each on a brightly colored background rectangle, so I set up a new canvas in Photoshop for the background. I created a new file that was 7.5 x 9 inches at 150 dpi. That’s the size I decided to make the repeat for my design.

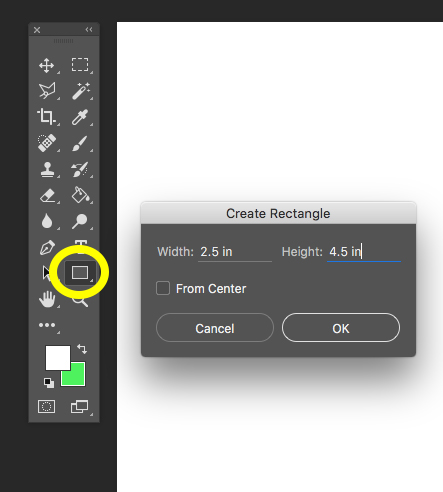
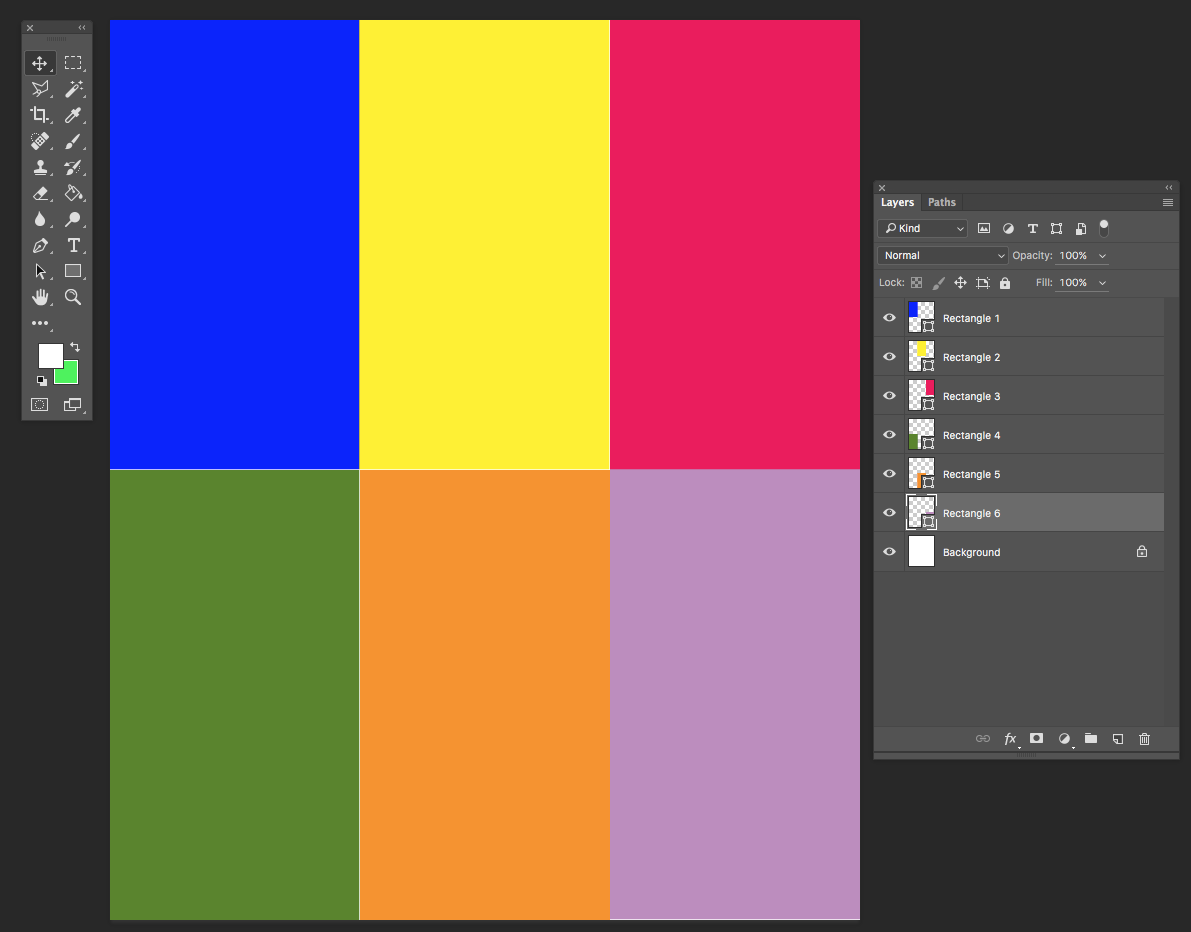
I filled this canvas with 6 rectangles, each 2.5 x 4.5 inches. I drew these using the Rectangle Tool (yellow circle below) and filled them with a random color. Hint: If you click once with the tool inside your canvas, it will bring up a dialog box and you can type in the exact size of the rectangle you would like. Just repeat that to make all six rectangles. Here’s a little more about how to use the Rectangle Tool. Use the Move Tool to move the rectangles into place and be sure that you have selected the layer that you want to move. (Each rectangle will be on its own layer.)


I am going to match the colors to the shoes a little later, so the colors don’t matter at this step, just pick ones with a lot of contrast.

Add the shoes to the design.

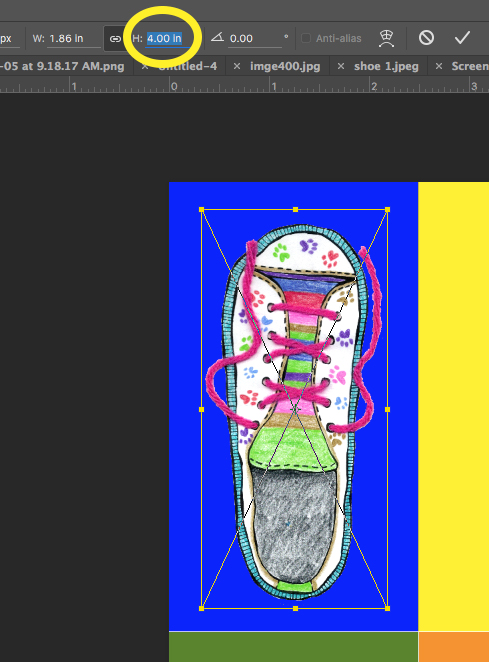
Next, I placed the shoes into the design, using File -> Place Embedded and chose the edited version with the transparent background. I resized each one as I brought it in so that each shoe would fit in a rectangle. I adjusted the height to make each one 4 inches tall and made sure to click the chain icon (to the left of the yellow circle) to make sure it was scaled proportionally and not “squished”. If you want to adjust them after you have placed them, be sure that you have the right layer selected. Each rectangle and each shoe will be on a different layer at this point.

Match the background colors to the shoes.

Finally, to recolor the rectangles and match them to the colors in the shoes, I used the paint bucket/eyedropper tool in combination. The annoying part of this step will be keeping track of which layer you are on, so I recommend going to Layer -> Merge Visible and making your design all one layer for this step.

I then switched to the Paintbucket Tool and hovered over a color in a shoe. When I hold down the option key with Paintbucket selected, my Paintbucket will transform to an eyedropper. I clicked with the eyedropper to choose a color from a shoe and then released the option key. Now the cursor switches back to paint bucket and I can click inside a rectangle to fill with that color. Continue to select (hold option – click) a color and paint (release option – click) until you have colors that you like.

My finished repeat is below.

Save it and order a yard.

Now save this design as a .jpg and upload it to Spoonflower. I liked mine arranged as a half-drop repeat. You can get two bags out of one yard of fabric. I chose Basic Cotton Ultra for this project because I wanted the bags to be sturdy but not too bulky since they are designed to go inside another bag.

If you aren’t feeling like you want to design your own fabric or you don’t have kids around to do some coloring with you, I also curated a collection of great shoe fabrics by other Spoonflower designers. You can shop that Shoe collection here.


This is a great place to tell you that Spoonflower is giving you, my readers, a 10% discount! Use coupon code Rahn10 when you place your order. It’s valid until September 30, 2017 for orders of fabric, wallpaper and gift wrap and can not be applied with any other promotional offers.


Sewing the bag

Materials you need to make the bag.

  • 1/2 yard of shoe fabric. Basic Cotton Ultra is a great choice.
  • 1/2 yard of lining fabric.  I chose a lightweight cotton/poly broadcloth in bright green.
  • a 22 x 2 inch scrap of very lightweight fabric for the drawstring casing. I used a scrap from the selvedge of a piece of Spoonflower’s poly crepe de chine. Nylon or poly lining fabric is also a great choice. You want something that will allow the drawstring to bunch up and close the bag.
  • 1 yard of 1/4 inch paracord
  • A cord lock toggle. I got mine from this shop at Etsy.

Cut out rectangles.

You need three rectangles to make each bag.

  • 23 inches x 14 inches of your shoe fabric.
  • 23 inches x 14 inches of your lining fabric.
  • 21 inches x 2 inches of a very lightweight fabric for the drawstring casing.

Hem and fold the casing.

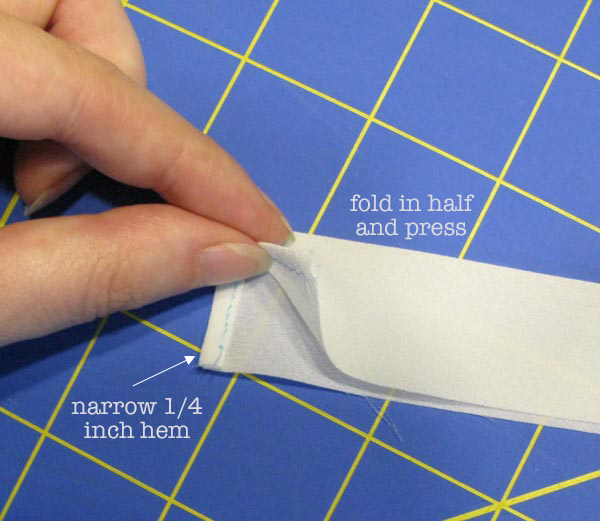
Start with the small rectangle of fabric for the drawstring casing. Make a narrow 1/4 hem at each short edge. Then fold the strip in half, matching the long edges and press.

Stitch the casing (top) edge.

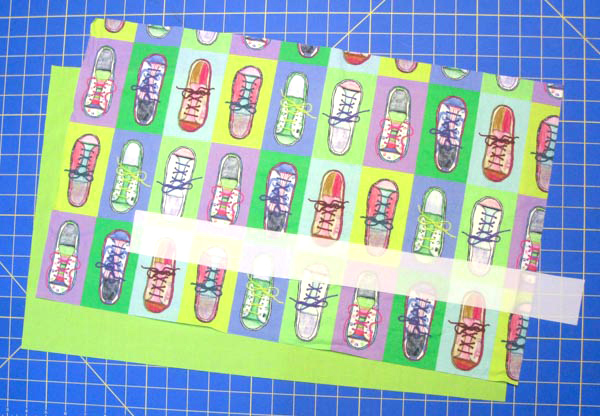
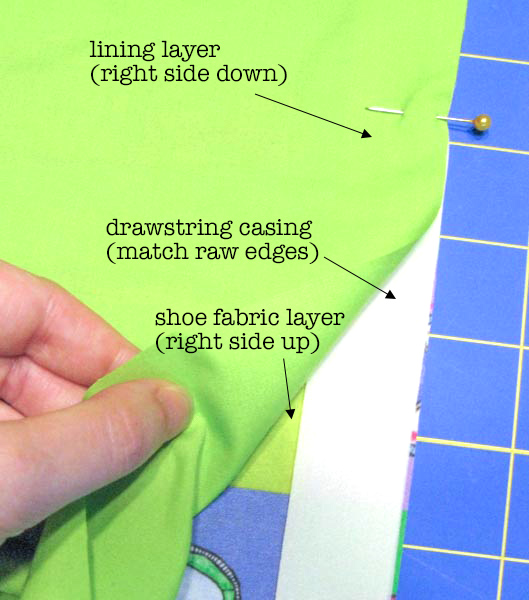
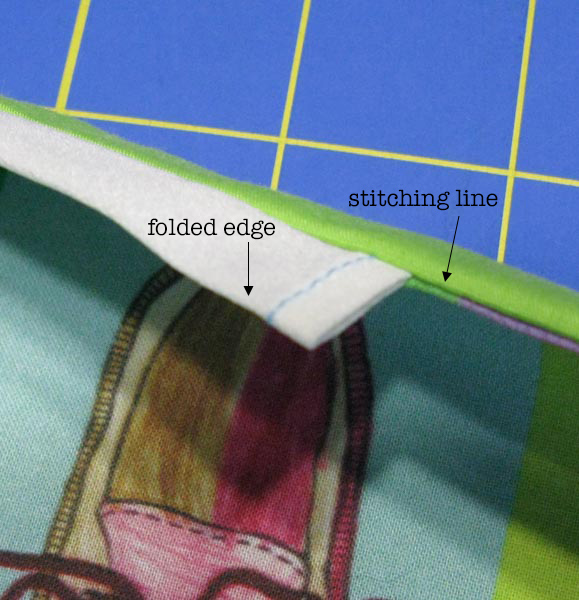
Lay the shoe fabric right side up on your table. Place the casing in the center of the long edge of the rectangle, matching the raw edges. Place the lining fabric right side down, matching the long edge. Pin through all the layers and then stitch the long edge using a 1/2 inch seam allowance.

Turn the layers right side out and press so that the casing is free at the top and the shoe and lining fabrics are pressed down wrong sides together.

Stitch the side seam.

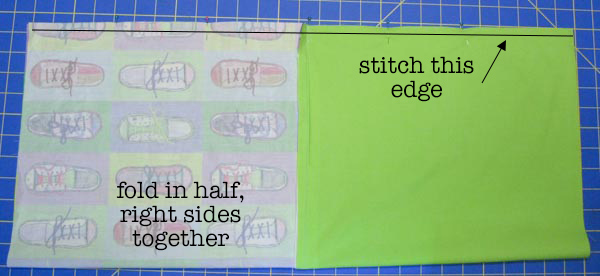
Unfold and open out your bag and refold it in half matching lining to lining and shoe fabric to shoe fabric. We are going to sew the outer and lining side seam all at once, making a tube. Match the long edges, pin and stitch with a 1/2 inch seam allowance. Press the seam open.

Mark the center, stitch the bottom.

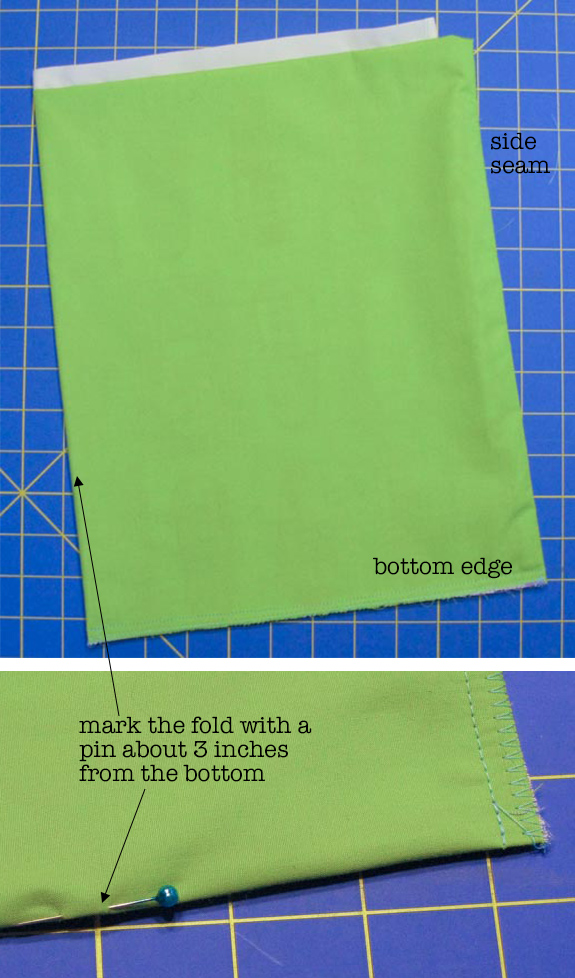
Turn the tube so that the casing is at the top, the shoe fabric is to the inside and lining is outside. It will be like a doubled over tube, open at the top and bottom.

We need to mark the side of the bag for the next step. Fold the tube in half along the stitching line at the side seam and lay it flat on a table. Then mark the opposite folded edge with a pin, about 3 inches from the bottom corner. You will use this pin to help make a corner gusset in the next step.

Stitch the bottom edge of the bag through all the layers, using a 1/4 inch seam allowance. You can serge or zig zag over this raw edge to keep it from fraying.

Open out the corners.

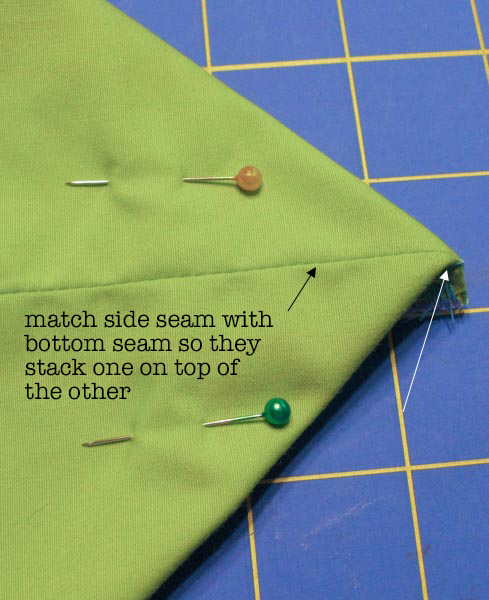
Starting with the side with the stitched seam, open out the corner of the bag and match the side seam (black arrow) to the bottom seam (white arrow). Stack them one on top of the other and fold it flat, creating a point right at the corner. Pin it to keep the seams from shifting.

Mark the gusset.

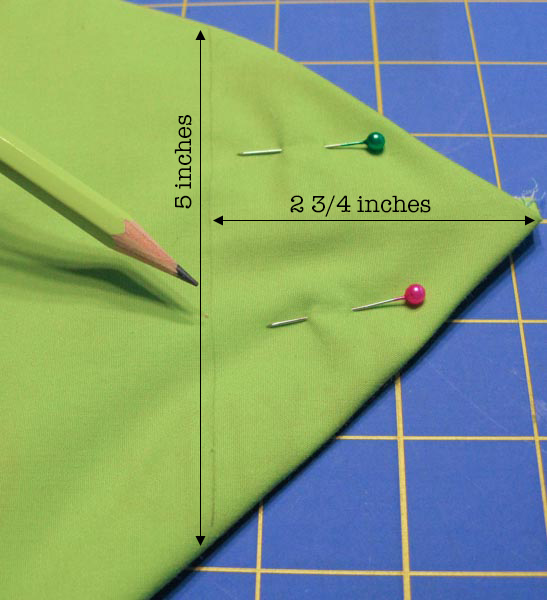
Measure 2.75 inches from the tip of the triangle and use a ruler to draw a light pencil line. Your line should be 5 inches from folded edge to folded edge. Stitch across the corner through all layers, following this line.

Repeat for the other corner.

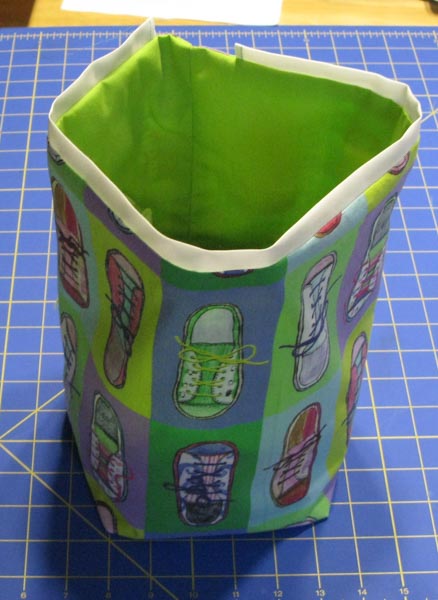
Since you don’t have a side seam on the opposite side, use the pin you placed to match the side to the bottom seam. Mark and stitch the same way. This will form square corners on the bottom of the bag. You can trim away the excess at the corners if you want to remove some bulk, but I like to just fold it towards the bottom and use is as an extra layer of reinforcement.

Turn it right side out & add the drawstring.

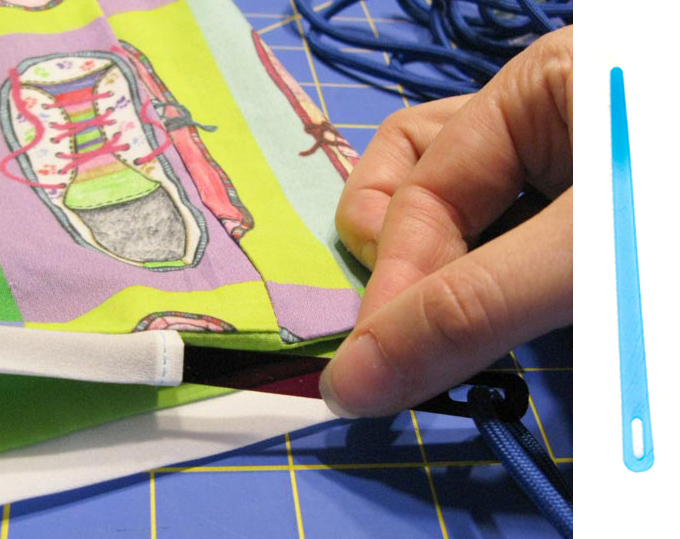
Turn the bag right side out. Cut a piece of paracord that is 36″ long. You can get one of my laser cut needles to thread the cord through the casing or use a large safety pin or elastic threader.

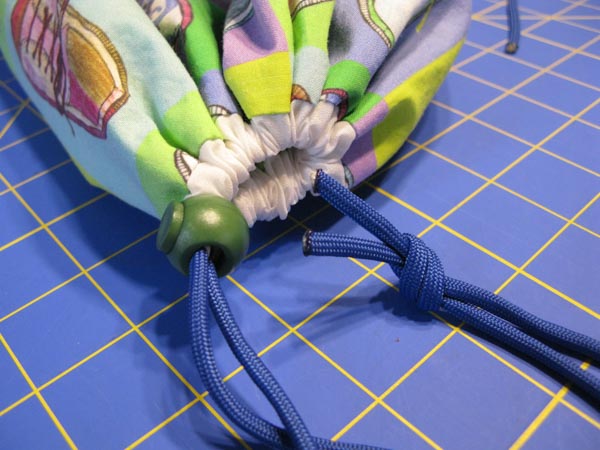
Slide the cord lock over the ends of the cord and then tie the cord ends together in a knot. Melt the ends of the cord so it doesn’t fray. (Please be careful! It gets hot and you should work in a ventilated area.)

If you want to follow along with the other blog hop posts in this series: Wednesday, August 2 – Robin Szypulski | Kritter Stitches – Bookbag on SF blog • Amy Watkins | Cozy Reverie – First / Last day of school photo pennants  • Kimberly Coffin | Sweet Red Poppy – 1st day of school outfit • Abby Glassenberg | While She Naps – Plushie key chain • Heidi Kenney | My Paper Crane – snack bags • Erin Williams | Printable Crush – book covers

Go to Top